- OTHER THINGS – yaffemays.com
- Bench is awesome.
- autopilot.
- Neat little blog engine that syncs with dropbox or google drive. Simple.
- A classic challenge
- Notes on the 3-day, 90 mile canoe race that happens us here every fall. So want to do this.
- Brief — A Chat Style for Skype 5 on OS X
- How to make Skype on Mac not look like a freaking cartoon.
- Nelson Swag Leg Desk – Home Office Desks – Desks & Tables – Herman Miller Official Store
- make me.
Tag: bench
Categories
Two New Vises
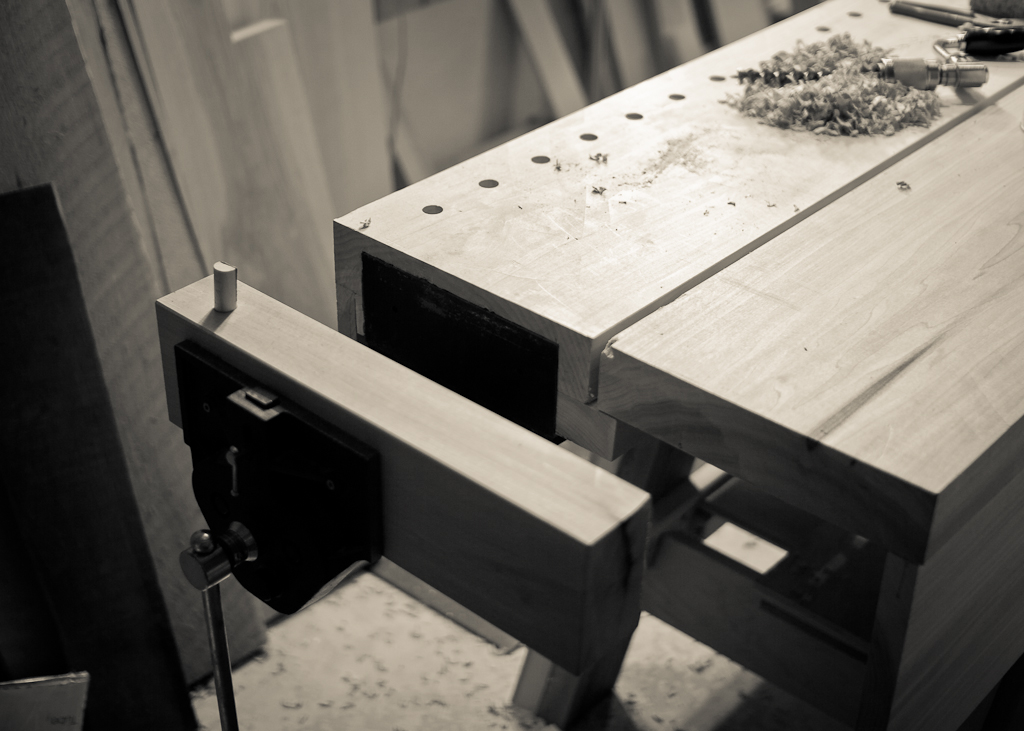

While my bench has been useable for a while now, I’ve wanted to add a tail vise to help when milling up stock. When milling by hand, you have to be able to go across the board, perpendicular to the grain, diagonal to the grain, and along the grain with your planes. While I can get this done with a planing stop and battens, a tail vise and dogs make it really easy.
After I scabbed on a spacer block, I chiseled out the mortise for the inner vise plate, so it would sit flush(ish) with the end of the bench. Word to the wise, don’t do this with a 1/4″ mortise chisel; it takes a couple of hours.
Next, I attached the vise and made up a quick chop from some 12/4 poplar left over from the bench top.

All that was left was to drill the dog holes and make some dogs to go in them. I ordered some 3/4″ maple dowel and it showed up a bit oversize. Sadly, oversize means it doesn’t fit, so I had to break out the 80 grit and atomize a couple hundredths of an inch of maple. Fit with a bullet catch, a small leather face, and a coat of wax, the dog is ready to go.

I had mentioned two new vises. The other is my edition of a Moxon with hardware from Benchcrafted. This build is really pretty simple, though you do get to practice a bit of fancy mortising for the nuts. Next time, I’d hold the nuts down with a holdfast while marking them. They shifted a bit under finger pressure and things got a bit sloppy. Still works though. Oh, and I’d gang up the two pieces when drilling the through holes. That way, any slight deviation from plumb and square carries through. Or I’d use a drill press. Still, a damn pretty bit of kit and it works beautifully.

Categories
Thickolson: Almost done
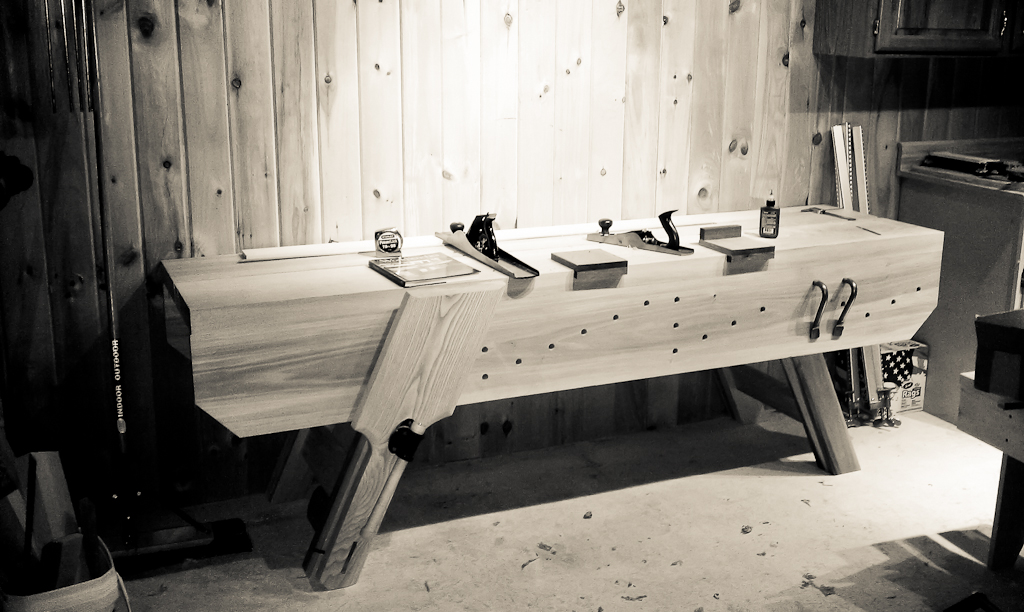

Almost there. Since last time, I have
- glued up the other half of the top,
- flattened the front apron and the side of the top so that they’re mostly flat and mostly flush,
- flushed up the front legs to the apron,
- made the vise chop and parallel guide,
- installed the parallel guide in the vise chop,
- chamfered off the vise chop to make it a little prettier,
- installed the vise chop, and finally
- flattened the top
What’s left? Not much at this point. I’ve got a planing stop all set, I just need to cut the mortise in the top. I’m debating where to put it though. I did a little playing around with it and I think I’m going to end up with it about 5 inches in from the front edge and a few inches behind the back of the leg vise. There’s a support under there I have to be a little careful of, and I don’t want the leg vise to get in the way.
Otherwise, I need to mill up a board or two to fit in the ½” gap between the top boards. I have a suitable piece of poplar that just needs to be thinned up a bit to fit. I also need to drill all the holes in the top for the holdfasts. I emailed Chris Schwarz for advice on placement; he advised holes across the back based on the reach of my holdfasts (I use the Grammercy Holdfasts) and a hole near the front to allow the holdfast to reach over a bench hook and secure work there for sawing.
Last, I’m debating adding a tail vise, using an old quick release vise from my last bench. To do it, I need to square up the right end of the bench properly, which is a little tricky as it’s end grain.
The top glue-up was uneventful, though it revealed that I had a nice little ¼” bow and cup in the two aprons. The cup was in the front apron and was relatively easy to pull out with a fore plane. I flipped the bench on it’s side, pushed it up against the wall feet first and treated it like a bench top. I ended up with a cross-grain situation between the top’s edge and the apron itself, but working cross grain it didn’t end up being too problematic. At the end, the apron wasn’t perfectly flat, but it doesn’t need to be.

Moving on, making the front vise was pretty fun, though I had another oops moment. I milled up the 8/4 Ash, laid out the curves on the bottom and went to work with a rip handsaw and a bow saw. For the chamfer, I used a block plane, spokeshake and a couple rasps for the curved bits. It’s amazing how well the rasps worked for cutting the curved chamfer.
And then I had my uh oh moment. The vise chop includes a parallel guide that fits into a mortise in the chop and slides through a mortise in the bottom of the front leg. Well, once I had these nice curves on the front, laying out the through mortise gets… interesting. Usually you would mark the mortise on one side, then transfer your lines around the board to the other side. Then you chisel in from one side, then the other and meet in the middle. This works well assuming you work from a reference edge towards both mortises where both faces are perpendicular to your reference edge.
After I made the vise chop all shapely, I no longer had a reference edge. Yikes. Lesson learned: lay out joinery before cutting shapely curves.
I figured, well, it’s a bench; it doesn’t have to be perfect. So I sat the chop on the leg, outlined the mortise in pencil and laid it out with a knife. Then I just went to town with a brace and bit and cleaned it all up with a chisel and a four square block to make sure my mortise was 90 to the inner face of the chop. I stuck a waste board under the other face of the chop so I had something to chisel into, in an attempt to prevent blowing out the opposite end of the mortise. It mostly worked. The through mortise is a little gappy on the show face, but it’ll be a good reminder. I glued it, wedged it, and called it done.
Installing the vise screw was trivial. Mark the hole, cut the hole, screw on the vise, mount with the provided screws.
Now to start figuring out what kind of tool storage I want on that nice blank chunk of wall.
Categories
Thickolson: Half of the top glued up

Finally. Last night I milled up the last screw block and attached it to the right side leg assembly. Once it was secure, it was time to start gluing on the top!
To account for seasonal wood movement, I’m only gluing along the apron and the first couple inches of the screw block and top leg stretcher. Once the glue it dry, I’ll spelunk down under the bench and screw in the middle edge with a deck screw, into an elongated hole. That way, the top can move a bit in width and not ruin the whole bench.
Tonight I’ll pull the clamps and glue up the other side of the top. I guess I could have done both sides at once, but alas, I don’t have enough clamps.
Oh, and I finally came up with a name for this thing: The Thickolson.

For a while, I’ve been mulling over how to take the 12/4 14″ poplar board and get it down to the 11 1/2″ board I need for the top. My initial plan had been to do the rip on my table saw with a rip blade. Poplar is pretty soft and with a good ripper, I was confident I could manage it. However, pushing a board of this size through a table saw is no mean task. After a few trial runs with supports in place, I realized I was in a bit of a pickle.
See, this board has a fair bit of wind in it. When you run a board through a table saw, you want the face that’s touching the table and the face that’s riding the fence to be flat and square. Otherwise, as I quickly found out on the dry runs, the board will cast away from the fence during the push. With a board this size, I elected not to take any risks. I could either flatten the board out and then run it, or rip the sucker by hand.
After taking a few exploratory passes with the fore plane, I determined that I could save a fair bit of thickness by ripping the board before flattening it. So, off to the races.
I started out over the board, in the classic ripping posture, but my back and shoulder quickly decided this was a bad move. The position that really worked for was standing next to the board with it clamped to my existing bench, blade facing away from me, just like in this video by Chris Schwarz:
It takes a while to get the hang of how to apply pressure the blade in this setup and to work out a rhythm. I laid out some marks every six inches to get an idea of how fast I was going; in the beginning I was doing about an inch a minute and by the end I’d about doubled that. All in the all, the rip took about hour of effort, with a bunch of breaks for water, rest, and to gauge my progress.
I did find that, for whatever reason, keeping the blade plumb in the stand-on-the-side configuration was much much easier. I think I just need to practice more with the “classic” posture, but it was pretty sweet to see that nice square 8′ long rip once I was done.